
Brushless Motor Control with Arduino


Hi Everyone,
In  this work, we will give movement to our brushless dc motor using arduino. For doing this experiment we need:
  • Brushless Dc Motor
  • Electronic Speed Controller (ESC) 
  • Potentiometer
  • Jumper Cables
  • Power Supply (Feeding the motor)
  • And of course Arduino 
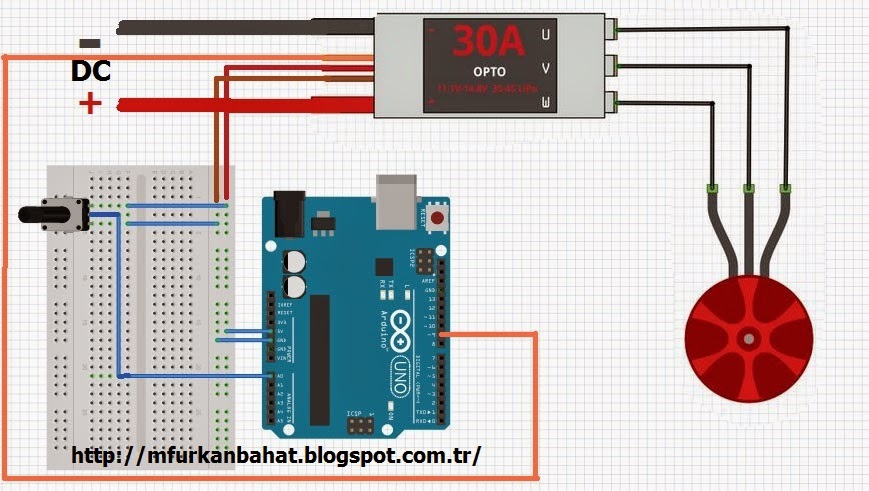
First of all we should do connections correctly, wrong connections gives problem for controlling the brushless dc motor. As a picture below we try to connect all cables, and also we should give power for electronic speed controller to control the brushless dc motor. If you do not give this voltage to ESC, motor also try to turning but this turning speed level depends on arduino 5 volt. Of course this is not effective. 


If we handle the connections, lets begin to coding.

Open the Arduino IDE for write the control codes, firstly we will determines our constant values. Potentiometer pin will be A0 on analog pins on Arduino. Secondly electronic speed controller output digital pins marked as 9. In the void setup() part we define the input output situation as you can see on picture below.


In the void loop() part we will write main part of control mechanism, firstly reading the analog input on defined potentiometer pin. Secondly we should mapped this values for writing by esc. After this mapping, we are using analogWrite command.
Also giving the delay for clear control.

You can reach the code clearly :


const int potpin = A0;  

const int escpin = 9;
int val;   

void setup(){ 
  pinMode(potpin, INPUT);
  pinMode(escpin, OUTPUT);
} 

void loop(){ 
  val = analogRead(potpin);      
  val = map(val, 0, 1023, 0, 179);     
  analogWrite(escpin,val);
  delay(15);                          
} 

Comments

Post a Comment

Popular posts from this blog

Artificial Horizon and Compass Using Arduino-Processing-MPU6050

Hi everyone, Today we will realize our artificial horizon using Arduino, Processing and MPU 6050 IMU. In this application I use Arduino Uno, If you should use different card, you should examine i2c communication for your card. For Arduino Uno connections will be like that: MPU6050 Pins       Arduino Uno Pins Vcc                        3.3V Gnd                       Gnd SCL                       A5 SDA                      A4 INT                       2 (Digital Pin) This my MPU6050, if you want more information about it: http://www.invensense.com/mems/gyro/documents/PS-MPU-6000A-00v3.4.pdf After it we connecting the MPU6050 to Arduino. If our Arduino-MPU6050 system is ready, we can begin to try it. In this level, we should read three dimensional degrees which are Phi, Theta, Psi on MPU6050 using serial monitor. For doing this of course we need the code, Here is the arduino code: // M.Furkan Bahat , November 2014 // For more information http:/

Onuncu Yıl Marşı - Arduino

Bir önceki çalışmamızda sizlere Arduino'nun hazır melodilerinden dinletiler sunmuştuk. Bu gün ise sınırları biraz daha zorlayıp Nokia 3310 Besteleyici deneyimime güvendiğim için kodları kurcalayarak bestelediğim Onuncu Yıl Marşı'nı bayrak sallayarak dinletmek istiyorum. Eğer gerçekten Onuncu Yıl Marşı olarak dinlerseniz öyle oluyor, lütfen biraz ön yargı :) (3310'nun besteleyisinden kat be kat zor bir iş olduğunu itiraf etmeliyim) Servo ucuna bağladığım bayrağı sürekli olarak bir sağa bir sola sallama isteğim, Tone.h kütüphanesinin Servo.h kütüphanesini yanında barındırmak istememesi üzerine sekteye uğradı. Timer hatası sebebiyle bunu yapamadım, fakat yılmadım servo'yu direkt melodi sinyalinin geldiği bacağa bağladım. Bu ise her ne kadar dolu dolu bir bayrak sallayış olmasa da gönlümüzü etmeye yetiyor :) Gerekli malzemeler: Servo Hoparlör Bağlantı Kabloları Olmazsa olmazımız bayrağımız. Bağlantının nasıl yapılacağına gelecek olursak Hoparlörün si

Görüntü işleme için Uçuş Denemesi

Merhabalar, Bu çalışmamızda havandan görüntü almak isteyen veyahut bu görüntüleri işlemek isteyen arkadaşlara referans olsun diye iki adet video paylaşacağım. Videoları kişisel bilgisayarınıza indirip görüntü işleme açısından çalışmalar yapabilirsiniz. Diğer taraftan yerde belirlediğimiz bir nesnenin boyutunun irtifa değerlerine göre ekranda kapladığı piksel değişimini inceleyebilirsiniz. Ya da en azından belirli irtifa değerlerinden nesneler ve insanların nasıl göründüğü hakkında genel kültür olur :) İlk videoda 70cm x 70cm beyaz bir levha kullanıldı, diğer taraftan oturan, ayakta ve yürüyen insan figürleri de videoda mevcut. Bunların çeşitli irtifa değerlerine göre dikey şekilde konumlandırılmış, yere doğru bakan kameradan nasıl göründüğü konusunda fikir sahibi olmanıza sebep olacağını düşünmekteyim. İkinci videoda 30-100 metre arasında dolaşan (genelinde 45 metre civarında) bir insansız hava aracından alınan görüntüler mevcut. Aşağı konumlandırılmış hedefler 70 cm x